Used instruments: camera settings (Mode, Bits).
Objects of research: microscope slide «Hydra, extened specimen showing genral structure w.m».
Task: To justify choice of a capture device Mode and choice of Bits parameter value.
Launch the Altami Studio application. For launching the application use the Altami Studio shortcut at the workbench or the menu item Start→Programs→Altami Ltd→Altami Studio 3.0. Besides, the application can be launched from a folder into which it was installed (usually it is C:\Program Files\Altami Ltd\Altami Studio 3.0\).
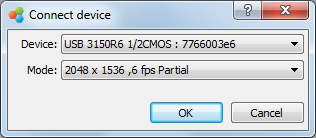
In Altami Studio application select the menu item File→Connect device.

Picture 1. Connecting camera
In list of devices of the Device menu find a model of the connected camera, in order to select the value of Mode parameter go to Step 3.
Altami Studio and Altami VideoKit applications support many capture devices and allow to control their settings. You can choose the device knowing which camera you have or having at the documentation for it, yet, selecting mode can be difficult for some users.
If you look at capture modes which the application offers you, you will see, for example, the following values: 512х384, 50 fps; 512х384, 20 fps Binning; 1024х768, 20 fps; 1024х768, 12 fps Binning; 2048х1536, 6 fps Partial.
Sizes 512х384, 1024х768, 2048х1536 pixels are video resolutions. You can define in pixels the size of the captured image (the greater size you select, the more place at disc the image will occupy, and the more time the capture will take). By great resolutions and comparatively small productivity the effect of lagging is possible.
Fps (Frames Per Second) value is a a number of frames per second at the monitor screen. This parameter is characterized by the quality of video stream: the bigger number of frames per second, the smoother is the transition between frames. In order to receive a smooth video you need to have not less than 20 fps.
Binning parameter determines mediation on adjacent pixels of the image (picture 2).

Picture 2. Processing of the image by Binning parameter
From one point of view, this parameter leaves the image rather accurate even by decreasing the resolution, from the other point of view — operation of mediation is held out directly by camera and because of that image capture or video capture happens faster.
So, the Binning parameter defines more qualitative processing of yet it is more resource-intensive.
The alternative is a Partial parameter which determines less resource-intensive, though, not so qualitative processing. In this case, by partial processing of the input image one value of the several adjacent pixels values is selected (image 3).

Picture 3. Processing of the image by Partial parameter
Select 512х384, 50 fps as a value of Mode parameter and direct the camera at the examined object. You shall receive the image as in the picture 4.

Picture 4. 512х384, 50 fps
By selecting the value 512х384, 20 fps Binning you shall receive the following image:

Picture 5. 512х384, 20 fps Binning
By selecting the value 1024х768, 12 fps Binning the image resolution shall be raised, yet, the transition between frames shall be less smooth (picture 6).

Picture 6. 1024х768, 12 fps Binning
Selecting the value 2048х1536, 6 fps Partial will characterize even greater resolution, yet, the partial parameter will determine less qualitative picture (picture 7).

Picture 7. 2048х1536, 6 fps Partial
By camera adjustment as often as by selecting the camera mode, Bits parameter setting can be difficult for users.
As the monitor can reflect 8 bits in each channel of three channel colored RGB model, and the camera matrix can be 10-bit or 12-bit, and the user has to select the bits which will define the quality of the image. If the user chooses hight bits, the image will be less detailed, yet, it will have no noises, also, it will be darker (picture 8). If the user chooses low bits, it is vice versa (picture 10).

Picture 8. Hight bits

Picture 9. Middle bits

Picture 10. Low bits
Altami software products work under the most popular modern operating system such as Windows, Linux и Macintosh.
If our products do not solve your problems, we are ready to develop "from scratch" or modify existing applications.
Tired of the slow camera work? Keep up with progress! The camera on USB 3.0! operates at a speed of up to 180 fps.